What's New in Bit? May 08, 2023

Weekly release notes v0.1.36
Run
bvm upgradeto get the latest stable version of Bit. See Install experimental releases to try out the latest experimental features.
New and improved
Single command to track and set envs
By default, directories tracked as components are set with the teambit.harmony/node env, which in is often not the desired env.
Bit now supports tracking a directory as a component and setting it with an env, simultaneously.
For example, to track the hello-world directory as a component, and set it with the React base env, run the following command:
Share your workspace diagnostics for better support
bit doctor provides a new option to generate a tar archive of the workspace, which can be used to reproduce issues.
The tar file includes a log file as well.
Found yourself stuck in an issue and need help? Run the following command, inside your workspace, and send the generated tar file to the support team on Slack.
The tar file is generated at the root of your workspace, and is named doctor-result-<timestamp>.tar.
New workflow to remove and recover components
A new workflow and command options to remove components from the workspace, and optionally from their remote scope.
Learn how to remove components from your local workspace, "soft remove" them from their remote scope, recover components, and more, in the updated Removing and deprecating components page.
#7333Update components to use the latest version of their locally maintained env
env update command now supports updating components to use an env from the workspace, if the latest env is maintained locally.
Performance
Installation speed improved by up to 50%.
Cases (specific to Bit) where the lock file was re-generated on installation are now fixed. This also helps to maintain a consistent lock file.
#7339 #7338Improved performance for fetching component data from server.
bit import, bit status, or any other command that fetches component data from the server is now faster
Core aspects are cached - not reloaded, to improve performance across the board.
#7344Bug fixes
Internal
Demos, tools and docs
👩🏫 Guide: How to update dependencies in a scope
Dependency duplication and dependency conflicts are common issues in large-scale projects.
Read this blog to learn how to debug backends components, build tasks, envs, and more.
👩🏫 Guide: How to debug components in a Bit workspace
Read this blog to learn how to debug backends components, build tasks, envs, and more.
👩🏫 Guide: How to install components in Bit workspaces and non-Bit projects
Bit components provide a standard Node package to make them easy to install and use in any project, Bit workspaces and non-Bit projects alike.
Read this docs page to learn how to debug backends components, build tasks, envs, and more.
🛠 Tool: A build-task that runs shell commands
A build task that runs shell commands to help you run any command you want, as part of your components' build pipeline.
Run the following to install the build task in your workspace:
Register the build task in your env, and pass the command you want to run:
/* your vase env (react, as an example) */
import { ReactEnv } from '@teambit/react.react-env';
/* the build task component */
import { ExecuteCommandTask } from '@learnbit/build-tasks.execute-command';

export class ExecuteEnvDemo extends ReactEnv {
  build() {
    /**
     * add the build task to the build pipeline,
     * and configure it to run a shell command
     * to add this task to another pipeline
     * @see https://bit.dev/reference/build-pipeline/builder-overview#add-a-task
     * */
    return super.build().add([ExecuteCommandTask.from('echo "hello world!"')]);
  }
}

export default new ExecuteEnvDemo();To learn more see the docs for this build task component.
New to component build tasks? Read this guide to learn how to handle your components' build tasks.
🛠 Tool: Netlify deployer now supports netlify.toml files
Install the latest version of the Netlify deployer to support netlify.toml files.
Add the deployer to app's plugin file:
const { Netlify } = require('@teambit/cloud-providers.deployers.netlify');
const { prerenderRoutes } = require('./prerender-routes');

/** @type {import("@teambit/cloud-providers.deployers.netlify").NetlifyOptions} */
const netlify = {
  accessToken: process.env.NETLIFY_AUTH_TOKEN,
  productionSiteName: 'hello-world',
  team: 'my-team',
};

/** @type {import("@teambit/react.apps.react-app-types").ReactAppOptions} */
module.exports.default = {
  name: 'my-app',
  entry: [require.resolve('.hello-world.app-root')],
  deploy: Netlify.deploy(netlify),
};Add the netlify.toml file to your component's (app) root directory:
└── hello-world
    ├── netlify.toml
    ├── app.tsx
    ├── hello-world.app-root.tsx
    ├── hello-world.react-18-app.cjs
└── index.tsSee this demo app to learn more about how to use it.
New to React component apps? Read this guide to learn how to build React apps with Bit.
🛠 Tool: An AWS Lambda app-type
The Lambda app-type supports building and deploying AWS Lambda function components.
To use it, configure the Lambda app-type in your workspace:
Choose between a generic AWS lambda and a lambda function URL:
Run the following to fork the AWS function URL app to your workspace:
Run the following to make this app loadable by your workspace:
Run the following to run the lambda function (app) locally:
🛠 Tool: A Node app-type
Use this Node app type to run Node apps locally and to bundle them for deployment (you can set your Node apps with the deployer of your choice).
Install the Node app type in your workspace:
Register the new app type using your Node env:
import { NodeEnv } from '@teambit/node.node';
import { EnvHandler } from '@teambit/envs';
import { AppTypeList } from '@teambit/application';
import { NodeAppType } from '@greetings/development.app-types.node-app-type';

export class MyNodeEnv extends NodeEnv {
  name = 'my-node-env';

  /* register the new app  */
  apps(): EnvHandler<AppTypeList> {
    return AppTypeList.from([NodeAppType.from({})]);
  }
}

export default new MyNodeEnv();See an example of a Node env using this app-type here.
New to Node app components? Read this guide to learn how to build Node apps with Bit.
Alternatively, get started quickly by forking a demo Node app:
Run the following to fork a demo Node app:
Make the Node app loadable by your workspace:
Run the following to run the app locally:
🛠 Tool: An SSH deployer
Set your Node apps with this SSH deployer to deploy them to a remote server.
Run the following to install the deployer:
Set your app with this deployer (we recommend using the new Node app type listed in this blog, as it also bundles your app for deployment):
const { Ssh } = require('@greetings/development.deployers.ssh-deployer');

const config = {
  host: process.env.SSH_SERVER_HOST_IP,
  username: process.env.SSH_SERVER_USERNAME,
  cwd: './api',
  privateKeyPath: process.env.SSH_PRIVATE_KEY_PATH,
  runCommand: "cd api && forever stopall && nohup forever app.cjs  &> /dev/null &'"
};

/** @type {import("@greetings/hello-world.apps.node-app-type").NodeAppOptions} */
module.exports.default = {
  name: 'hello-world-api',
  entry: require.resolve('./hello-world-api.app-root'),
  deploy: Ssh.deploy(config),
  portRange: [3000, 4000],
};Snap your app component to deploy it. To learn more see App deployment.
👁 Demo: A component-based web CLI
This project uses Bit and Web Containers to build a component-based web CLI. See the live demo here.

The app's dependency graph:
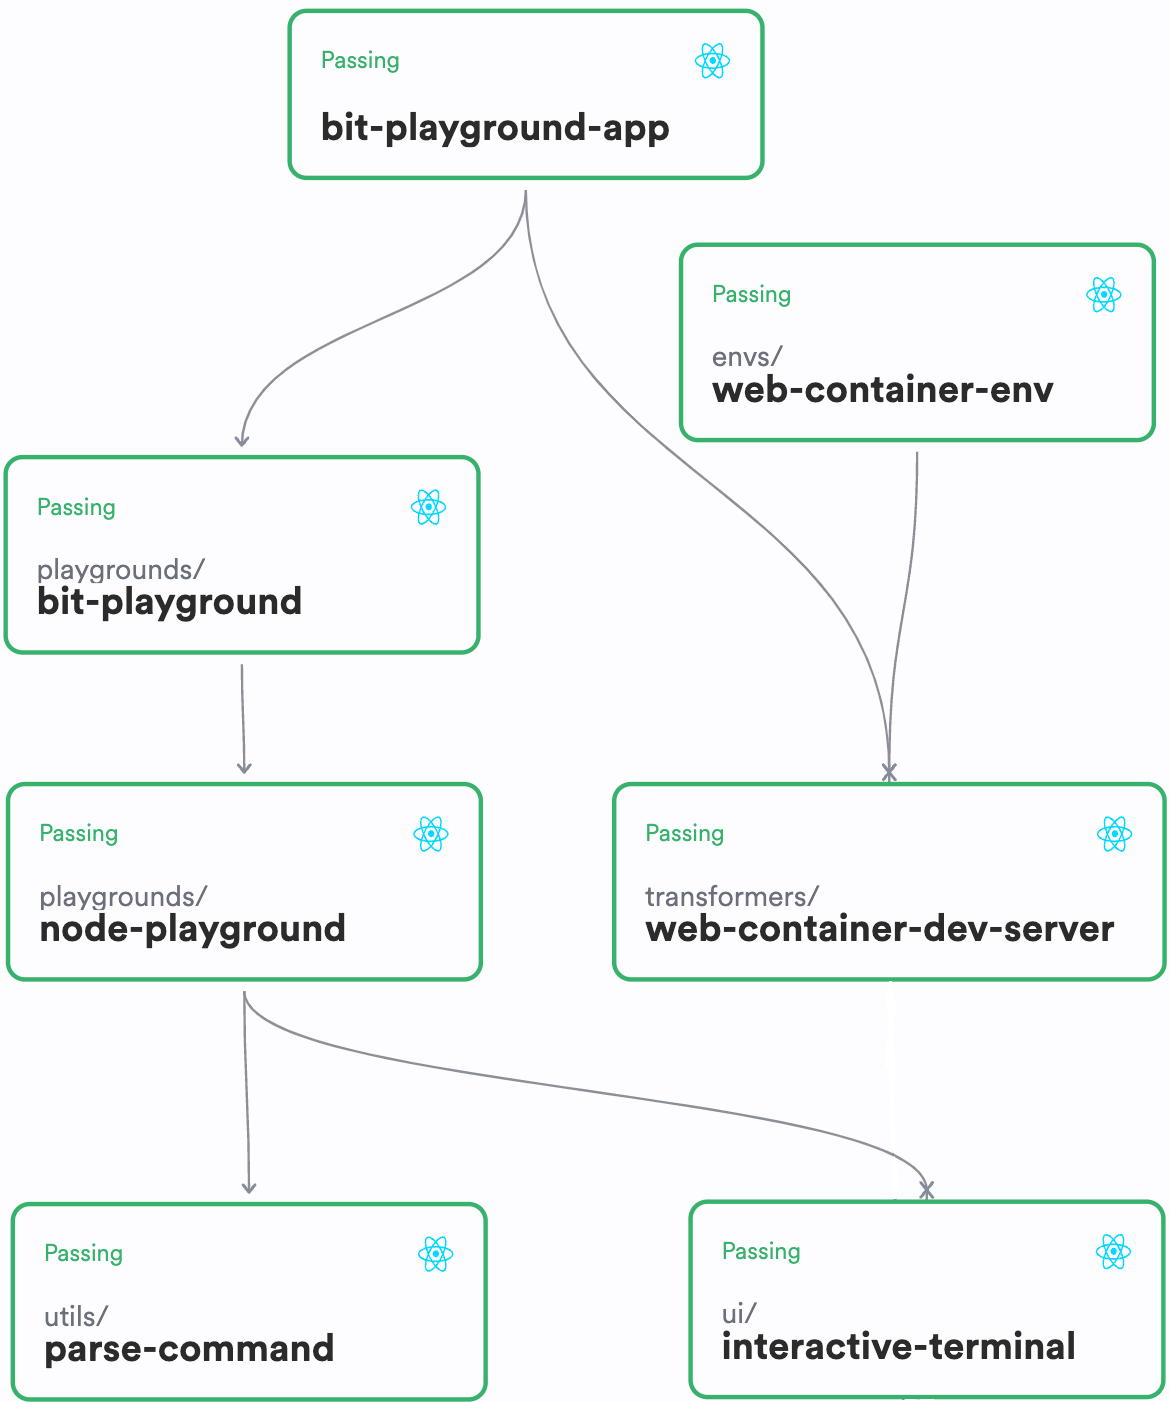
Component development tools:
The app and the env (for React components implementing web-containers) use the web-container-dev-server Webpack transformer to set the dev server with the proper headings for a web-container (for the component preview and for the app run, in dev mode)
New to Bit's Webpack transformers? Read this guide to learn how to use them to modifies your component previews and apps' webpack configurations.
🛠 Tool: A prerenderer build task
We created this build task to prerender our docs pages, and we're happy to share it with you! The build task was created to make it easier for us customize, debug and test our app's pre-rendering process.
To use it, install the prerender build task in your workspace:
Add the prerenderer build task to your env (note that, this should be added to an env used only by your apps. For example, see teambit.community/envs/community-react-apps):
import { ReactEnv } from '@teambit/react.react-env';
import { CommunityReact } from '@teambit/community.envs.community-react';
import { PrerenderTask } from '@teambit/community.tasks.prerender';

export class MyReactEnv extends ReactEnv {
  build() {
    return super.build().add([PrerenderTask.from({})]);
  }
}

export default new MyReactEnv();Add a prerender-routes.js file to your app's root directory:
└── hello-world
    ├── prerender-routes.js
    ├── app.tsx
    ├── hello-world.app-root.tsx
    ├── hello-world.react-18-app.cjs
└── index.tsFor example:
/* @filename: prerender-routes.js */
module.exports.prerenderRoutes = ['/'];See our React community app env, to learn more about how we use this build task to prerender our docs pages.
New to component build tasks? Read this guide to learn how to handle your components' build tasks.