Sharing Types Between Your Frontend and Backend Applications
In my role as a father of five sweet little children, I strive to spend as much time with them as possible. Thankfully, I have the opportunity to work from home, so I can spend more time with my family.
There was a problem, though, because my children complained that I wasn't giving them enough attention. Ultimately, we had a problem with our type definition.
This is the type of Dad they expected (as the "clients"):
export type Dad = {
  name: string;
  age: number;
  children: number;
  spendWithChild?: (childAge: number) => number;
};Only this type of data was being output by me (as the service worker):
type Dad = {
  name: string;
  age: number;
  children: number;
  spendWithChild: 20; // 20 minutes a day
};My children expected an exponential number based on their age, while I returned a constant time of 20 minutes per child.
In the end, our contracts aligned and we agreed to share the same type:
export type Dad = {
  name: string;
  age: number;
  children: number;
  spendWithChild: (children: number) => 20; // Should always return 20 minutes per child :)
};Backend and frontend applications should share types. It provides more clarity, makes API integration faster, and eliminates many bugs.
The purpose of this tutorial is to demonstrate how to share types using entity components created with Bit. By using the same entity component, both frontend and backend applications will have their contracts aligned and their API signatures will be the same (in simple terms, the frontend developer will always know what kind of data the backend is returning).
Entity components can be added to as many frontend and backend applications as needed to standardize and manage shared types. As long as Bit manages your dependencies, they stay in sync with frontend and backend applications (when you release a new version, both frontend and backend apps are updated).
Sharing types is just one of many useful ways to use entity components. You can watch this video to learn more.
Here's the entity component where are going to create:
In case you prefer to watch rather than read, you can see me talking about sharing types with Bit here:
Setting Up our Workspace
This guide assumes that you have a bit.cloud account and know how to open a remote scope.
Please make sure that the Bit binary is installed on your machine:
npx @teambit/bvm install
The first step is to create a Bit Workspace. A Workspace is a development and staging area for components. Here, we create new components, retrieve and modify existing ones, and compose them together.
Bit’s workspace is where you develop and compose independent components. Components are not coupled to a workspace; you can dynamically create, fetch, and export components from a workspace and only work on them without setup.
Each component is a standalone “mini-project” and package, with its own codebase and version. The workspace makes it easy to develop, compose, and manage many components with a great dev experience.
You can develop all types of components in the workspace, which is tech-agnostic. A workspace can be used as a temporary, disposable context for components, or as a long-term workshop.
Without further ado, let's create a Workspace. In the designated directory, run the following command:
In the root of your workspace, two files and one directory will be created:
workspace.jsonc: This file contains the configuration of the Workspace..bitmap: Here Bit keeps track of which components are in your workspace. You shouldn't edit this file directly..bit: This is where the component's objects are stored.
Here is how the Workspace looks like:
Please ensure you replace "defaultScope": "[your-bit-cloud-username].[scope-name]" with your Bit Cloud user name and the scope name.
Now that we've set up our workspace, let's experiment with some components!
Developing the frontend and backend components
Let's start by creating the backend component using the create command, which generates components from component templates . Component templates give you boilerplate code and folder structure for new components.
We'll need to add this component to our workspace.json file since it's of application type. Components can be built, served, and deployed using application types. There is a build strategy for each application type (Node, React etc.) for development and production, as well as a deployment solution for each application type.
Add this line to the top level of your workspace.json file. This component will be added to your Workspace as an extension.
{
...
"nitsan770.shared-types/backend/server": {},
...
}Don't forget to replace my user and scope names with yours.
bit status is a useful command that tells you what's the status of components in your workspace is. Let's run it to see if everything is okay:
Here's the output we get:
new components
(use "bit tag --all [version]" to lock a version with all your changes)

     > backend/server ...  issues found
       missing packages or links from node_modules to the source (run "bit install" to fix both issues. if it's an external package, make sure it's added as a package dependency):
          route.ts -> express (missing package)
server.app-root.ts-> express (missing package)As you can see we are missing the express package . We can install it in our Workspace using the following command. We'll also install CORS to enable it in our server.
Let's modify the mock-route file of our component:
import type { Route } from './route';

type Dad = {
  name: string;
  age: number;
  children: number;
  spendWithChild: 20;
};

export function getDaddyRoute(): Route {
  const dad: Dad = {
    name: 'Nitsan Cohen',
    age: 33,
    children: 5,
    spendWithChild: 20,
  };
  return {
    method: 'get',
    route: '/spend-time-with-daddy',
    middlewares: [async (req, res) => res.send(dad)],
  };
}And add CORS headers to the response:
server.app-root.tsimport Application from 'express';
import cors from 'cors';
import { getPort } from './get-port';
import { getDadRoute } from './mock-route';
export const expressApp = async () => {
const app = Application();
app.use(cors());
const port = await getPort();
registerRoutes(app);
app.listen(port, () => {
console.log(`server app listening on port ${port}`);
});
};
function registerRoutes(app: Application.Application) {
const mockRoute = getDadRoute();
const routes = [mockRoute];
routes.forEach((route) => {
app[route.method](route.route, route.middlewares);
});
}
expressApp();It's time to run our server-side component! Run the following command:
You should see the following output in the terminal:
server app listening on port 3000

server app is running on http://localhost:3000If you go to your browser and visit http://localhost:3000/spend-time-with-daddy, you should see the following output:
{
  "name": "Nitsan Cohen",
  "age": 33,
  "children": 5,
  "spendWithChildren": 20
}Now let's do the same for the frontend component. First create it from the react-app template:
Then add it to our workspace.json file:
{
...
 "nitsan770.shared-types/backend/server": {},
 "nitsan770.shared-types/frontend/fetch-daddy": {},
...
}Now let's modify the app.tsx file to fetch the Dad data from our running server:
import React, { useEffect } from 'react';

type Dad = {
  name: string;
  age: number;
  children: number;
  spendWithChild?: (childAge: number) => number;
};

export function FetchDadApp() {
  const [dad, setDad] = React.useState<Dad | null>(null);
  useEffect(() => {
    fetch('http://localhost:3001/spend-time-with-daddy')
      .then((res) => res.json())
      .then((data) => setDad(data));
  }, []);

  return (
    <>
      <div>
        The time you have with your Dad is:
        {dad?.spendWithChild(7)} minutes.
      </div>
    </>
  );
}It's time to run our frontend component app! Run the following command:
Unfortunately, you will see the following error when you open the app in the browser:
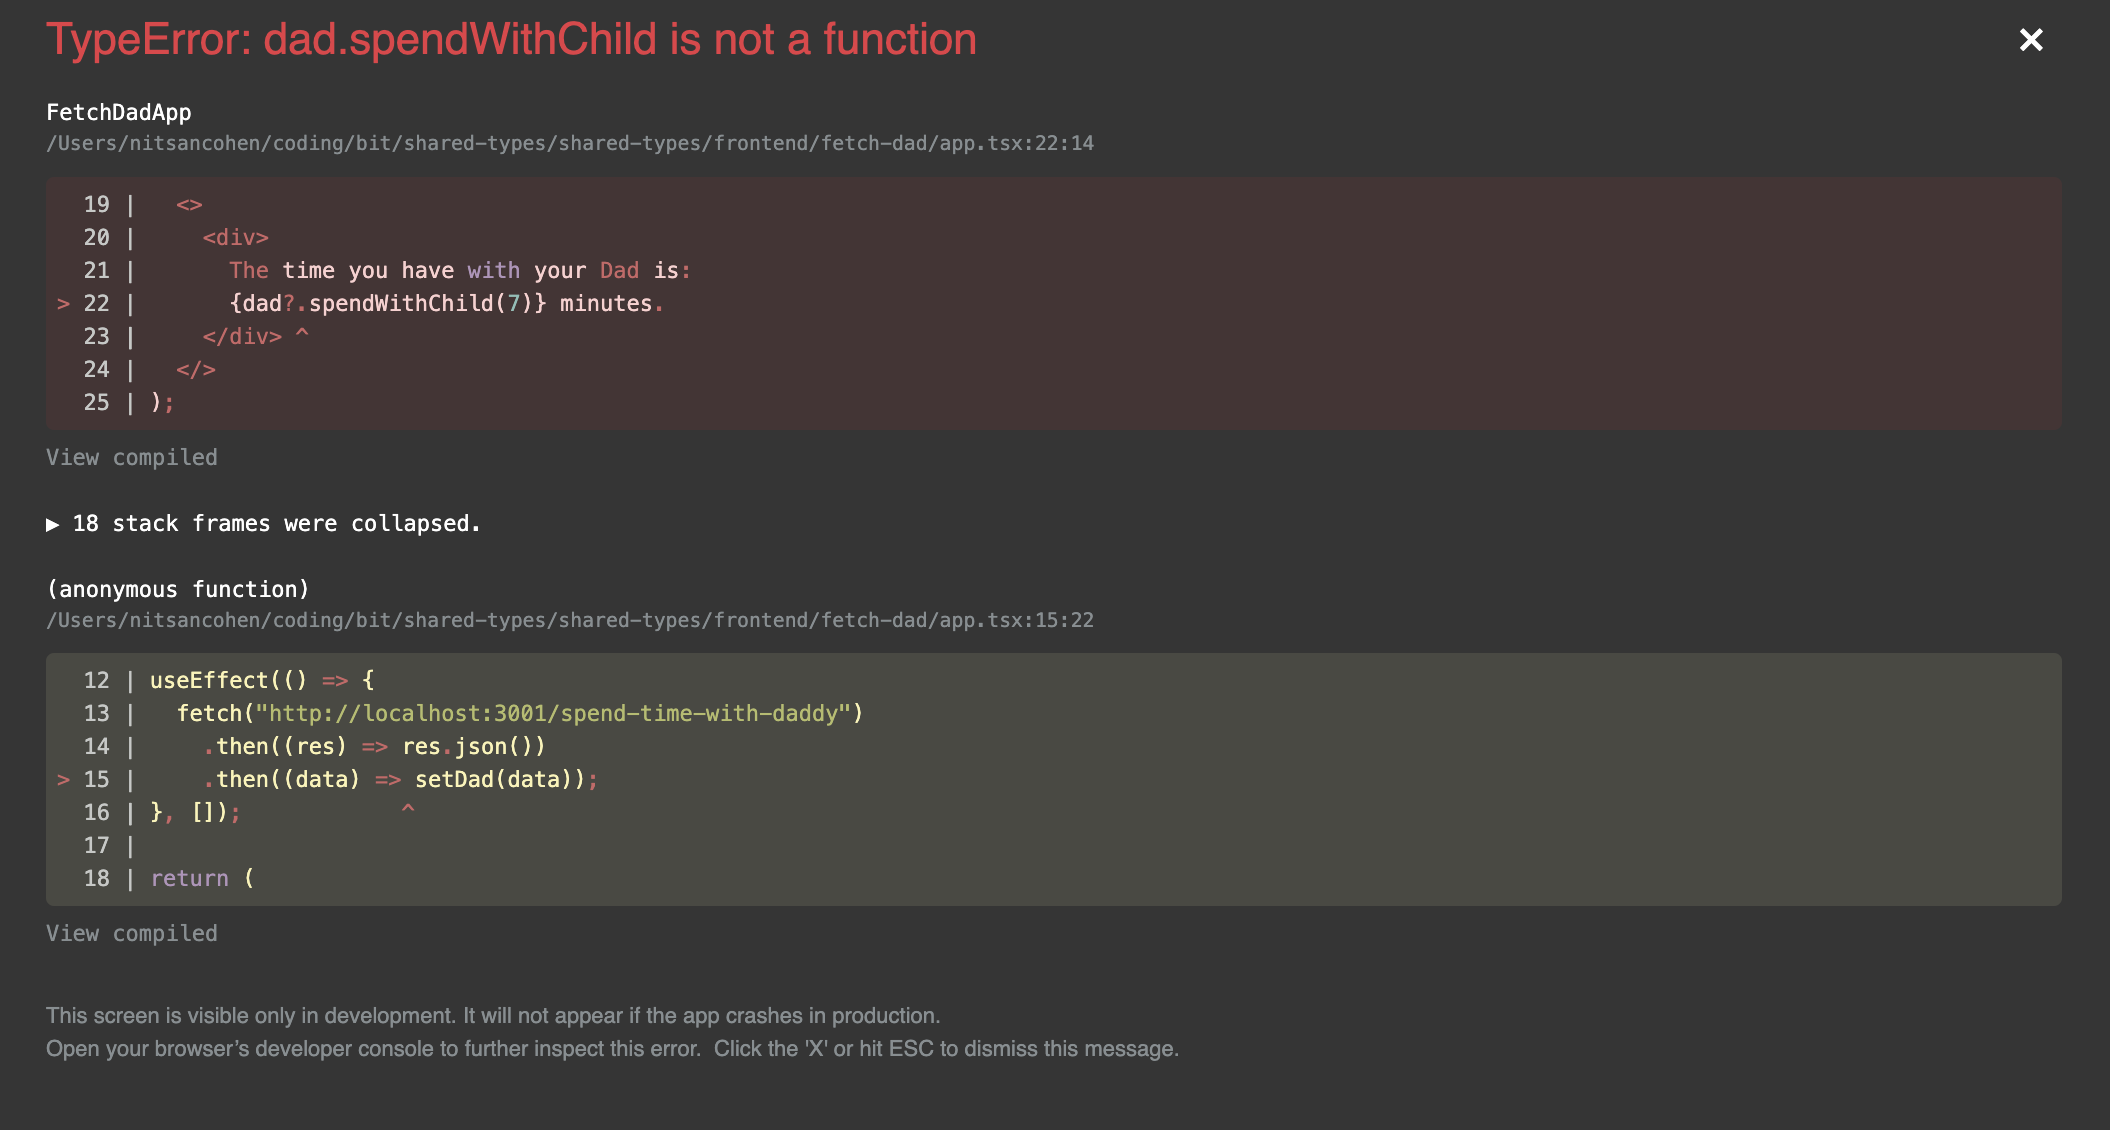
That's exactly what I told my little child: Dad.spendWithChild isn't a function!
In the backend, the spendWithChild property is set to a number. In the frontend app, spendWithChild is considered a function.
Obviously, you'll get an error if you try to invoke an integer.
Well, you already know what the solution is. A shared entity (type) component!
Creating the shared entity (type) component
First we'll have to add
as an extension to our Workspace, since we are going to use a component template that is not part of the Bit's core ecosystem(by the way, you can add your own component templates).Add the following line to your workspace.json file:
{
  "nitsan770.shared-types/backend/server": {},
  "nitsan770.shared-types/frontend/fetch-dad": {},
  "teambit.community/envs/community-react@2.1.3": {},
...
}Now let's run the following commands to install the extension:
bit install && bit compileIf you run bit templates, you will see that my-entity template also appears(right at the bottom):
The following template(s) are available with the command bit create:
Example - bit create <template-name> <component-name>
teambit.generator/generator
    component-generator (create your own component generator
Docs: https://bit.dev/docs/dev-services-overview/generator/generate-component)
    workspace-generator (create your own workspace generator -
Docs: https://bit.dev/docs/dev-services-overview/generator/generate-workspace)

teambit.pipelines/builder
    build-task (create a custom build task for your component pipelines)

teambit.react/react
    react (a basic react component)
    react-context (a react context component)
    react-hook (a react hook component)
    react-js (a basic react component in js)
    react-env (customize the base React env with your configs and tools)

teambit.harmony/aspect
    aspect (extend Bit capabilities)

teambit.html/html
    html-env (customize the base Html env with your configs and tools)
    html (a basic html component)

teambit.harmony/node
    node-env (customize the base Node env with your configs and tools)
    node (a Node.js module)
    express-app (a bit express application)
    express-route (an express route)

teambit.react/react-native
    react-native-env (customize the base React Native env with your configs and tools)
    react-native (a basic react native component)

teambit.mdx/mdx
    mdx (MDX-file compiled by Bit to a reuseable component)

teambit.community/envs/community-react@2.1.3
    my-react (react components with figma embed and scss)
    my-entity (entity component)  <-- this is the one we are looking for
Let's create our shared entity (type) component:
We are referring to this component as an entity, not a type. The main difference is that we are creating a component that can manipulate data as well (by using ES6 classes). As a result, we have a standardized way to manipulate the object and end up with cleaner frontend and backend code.
Additionally, if someone needs to manipulate data, they can update the entity component and anyone else who needs it afterward will also benefit (since they won't have to repeat the logic).
Let's have a look at the entity component:
dad.tsxexport type DadProps = {
name: string;
age: number;
children: number;
readonly spendWithChild?: number;
};
export class Dad implements DadProps {
constructor(
readonly name: DadProps['name'],
readonly age: DadProps['age'],
readonly children: DadProps['children']
) {}
get spendWithChild() {
return 100 / this.children;
}
static fromObject(plainDad: DadProps) {
return new Dad(plainDad.name, plainDad.age, plainDad.children);
}
toObject() {
return {
name: this.name,
age: this.age,
children: this.children,
};
}
}spendWithChild is now a getter method that returns the number of minutes Dad spends with his children.
We can then use the dad.spendWithChild in our frontend component and enjoy a much cleaner codebase:
import React, { useEffect } from 'react';
import { Dad } from '@nitsan770/shared-types.entities.dad';

export function FetchDadApp() {
  const [dad, setDad] = React.useState<Dad | null>(null);
  useEffect(() => {
    fetch('http://localhost:3001/spend-time-with-daddy')
      .then((res) => res.json())
      .then((data) => setDad(data));
  }, []);

  return (
    <>
      <div>
        The time you have with your Dad is:
        {dad?.spendWithChild} minutes
      </div>
    </>
  );
}Also, we have to add the new entity to our backend:
import type { Route } from './route';
import { Dad } from '@nitsan770/shared-types.entities.Dad';

export function getDadRoute(): Route {
  const dad: Dad = Dad.fromObject({
    name: 'Nitsan Cohen',
    age: 33,
    children: 5,
  });
  return {
    method: 'get',
    route: '/spend-time-with-daddy',
    middlewares: [async (req, res) => res.send(dad)],
  };
}Mocked Dad
Now that we have a shared entity component for the frontend and backend, we can mock it.

There are a few benefits to having the mock in the entity component:
- It is no longer necessary for developers to mock their test/rendering data when building features around these entities.
- Mocks allow you to add tests to entity components, so API changes will be more easily visible. There is no need to wait for something to break in other teams to figure out what went wrong.
Here's how to mock the entity component:
dad.mock.tsimport { DadProps } from './Dad';
export const mockDad: DadProps = {
name: 'Nitsan Cohen',
age: 33,
children: 5,
};Let's add a test for the entity component:
dad.spec.tsimport { Dad } from './Dad';
import { mockDad } from './Dad.mock';
describe('Dad', () => {
it('should not spend more than 20 minutes per child', () => {
const dad = Dad.fromObject(mockDad);
expect(dad.spendWithChild).toBeLessThanOrEqual(20);
});
});If you run the test, you'll see that the entity component works:
The test passed:
PASS  shared-types/entities/Dad/Dad.spec.ts
  Dad
    ✓ should not spend more than 60 minutes with the children (1 ms)

Test Suites: 1 passed, 1 total
Tests:       1 passed, 1 total
Snapshots:   0 total
Time:        0.598 s, estimated 1 s
Ran all test suites.In this way, if something breaks, we don't release it, or can at least notify the entity consumer with the appropriate semi-version.
Another major benefit is the ability to export the mock and use it in backend and frontend tests. As a result, developers on other teams save a great deal of time.
Tag and export components
Now that we've developed our components it's time to tag and release them to the community (or only to your organization if you want).
During the tag process, your component will go through these steps:
- Bit locks the current state of the component (like git commit, but for components instead of repositories).
- The component tests will run and you'll see the results.
- Your component will be built and packaged so anyone can install it in their projects.
- In app type components, the component will also be deployed wherever you define it.
Note that all of these phases are completely customizable and you can add any steps you want.
Gotta tag 'em all!
You'll see the following output:
new components
(first version for components)
> backend/server@0.0.1
> entities/dad@0.0.1
> frontend/fetch-dad@0.0.1As you can see, each component is versioned independently. You can use any of them in any project. Components can be imported into any workspace and edited however you want, and then tagged with a new version. You don't have to clone the whole repo to just change one thing.
The next step is to export your component. In this guide we'll export them to bit.cloud. It's free and it's easy. However you can also export them to your own server if you want.
Success!
exported the following 3 component(s):
nitsan770.shared-types/backend/server
nitsan770.shared-types/entities/dad
nitsan770.shared-types/frontend/fetch-DadThe components are now fully discoverable on bit.cloud. You can install them with any package manager.
nitsan770.shared-types.entities/dad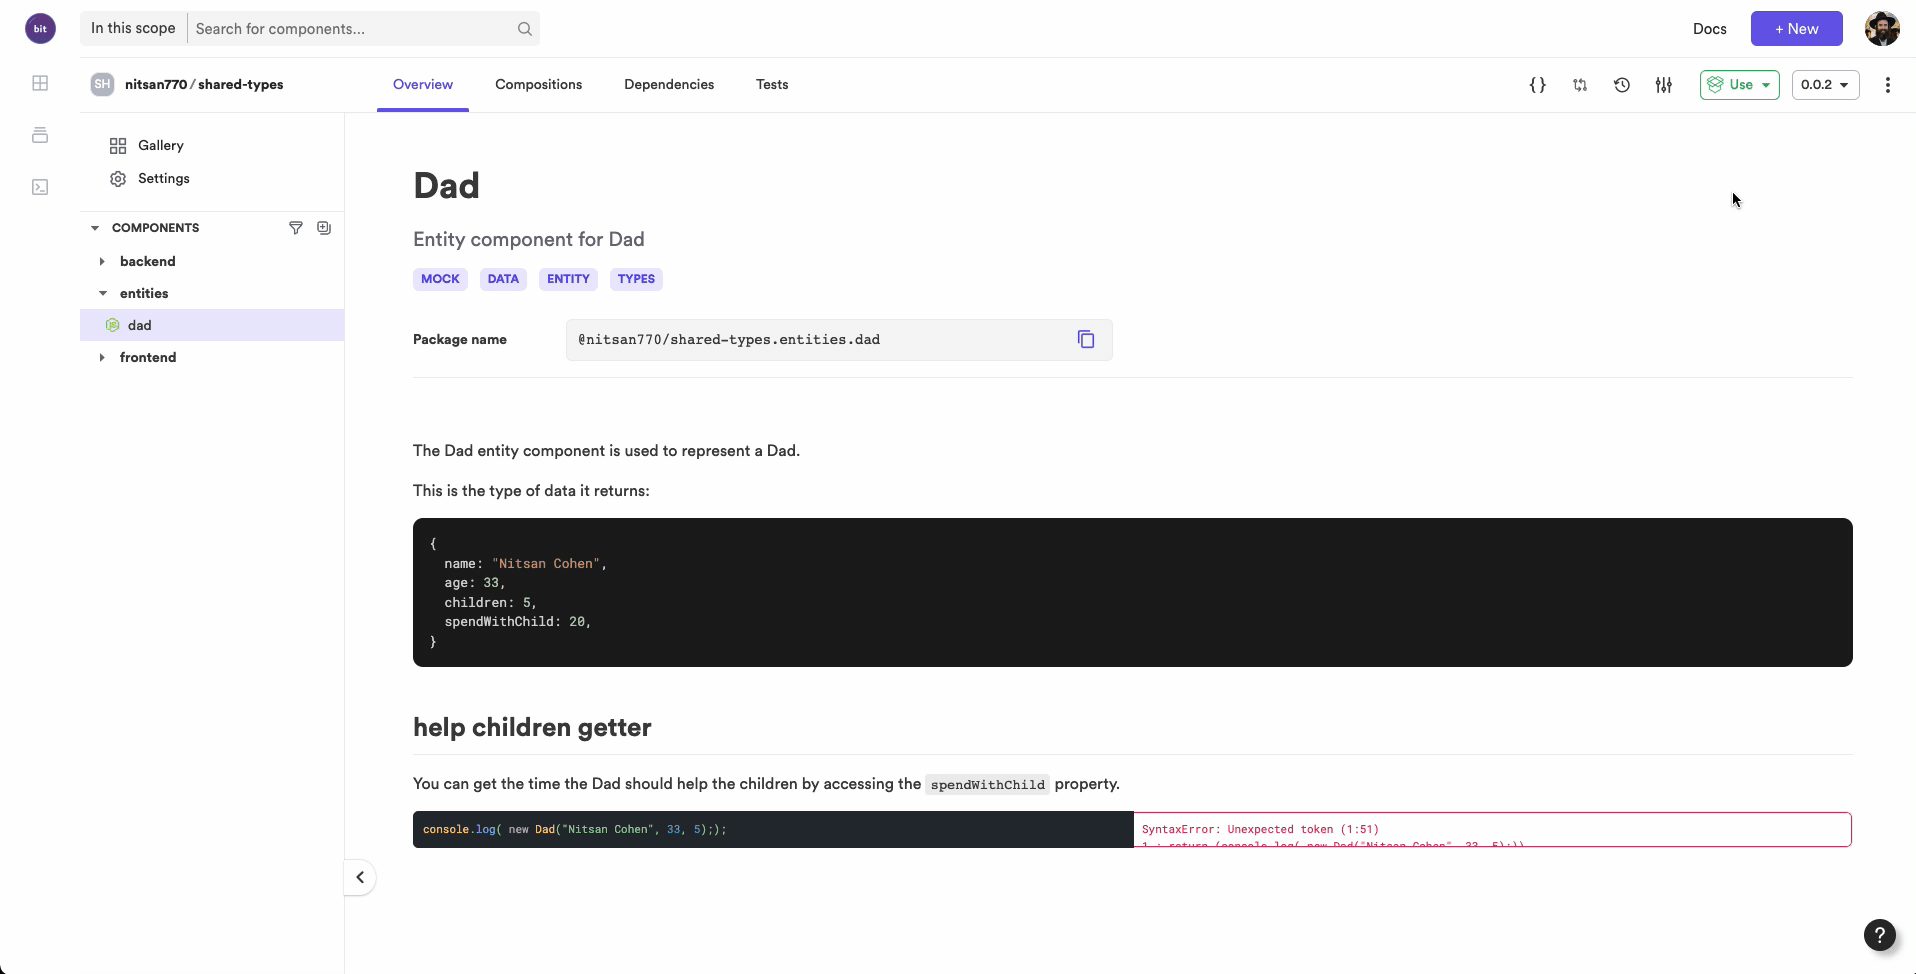
Managing dependencies
Though the real beauty about sharing this type using Bit is the ease of managing dependencies.
Imagine that later on a new child was added to the family. To keep the sum on 20 minutes, we would like to update the spendWithChild getter method.
export type DadProps = {
  name: string;
  age: number;
  children: number;
  readonly spendWithChild?: number;
};

export class Dad implements DadProps {
  constructor(
    readonly name: DadProps['name'],
    readonly age: DadProps['age'],
    readonly children: DadProps['children']
  ) {}

  get spendWithChild() {
    return 120 / this.children; // 20 minutes per child
  }

  static fromObject(plainDad: DadProps) {
    return new Dad(plainDad.name, plainDad.age, plainDad.children);
  }

  toObject() {
    return {
      name: this.name,
      age: this.age,
      children: this.children,
    };
  }
}Let's tag the component with a new version:
And here's the output of the tag:
changed components
(components that got a version bump)
     > nitsan770.shared-types/entities/dad@0.0.2
       auto-tagged dependents:
            nitsan770.shared-types/backend/server@0.0.2
nitsan770.shared-types/frontend/fetch-dad@0.0.2We didn't change anything on the frontend or backend. How did they get tagged? The components were automatically tagged, if you look closely. Bit has detected these components are using the entity component as a dependency and since it was modified and tagged, so were the dependents.
Note that the auto tag process only works if all components are in the same workspace. But don't worry. We're launching Ripple soon. When you export a component to bit.cloud, Ripple will automatically detect which components are using it, and will also upgrade their versions (and notify you if something went wrong).
It would be possible to set updates to auto if it's a minor update, and to manual if it's a breaking change. As a result, you are always in control of your components and can ensure they are working properly.
What can I say? After that, they lived happily ever after :)
Summary
We saw how easy it is to make a shared entity component that can be used in any project.
Having a shared entity component between our frontend and backend has these benefits:
- It's independent and has its own release cycle.
- Make integration easier for developers.
- A single source of truth about what an entity is.
- Design-time integration with local feedback in the IDE as you integrate.
- Updates on changes to the entity encapsulated in a component.
- Consumers can test against mock data.
- Provide types and interfaces for remote APIs.
- Tests, documentation, usage examples.
Hopefully you'll find this useful and use it in your projects.
You can read our official docs for more info. Feel free to join us on Slack if you have any questions. We're always here to help.