Integrating Bit with your Existing CI
Integrating Bit with your Existing CI

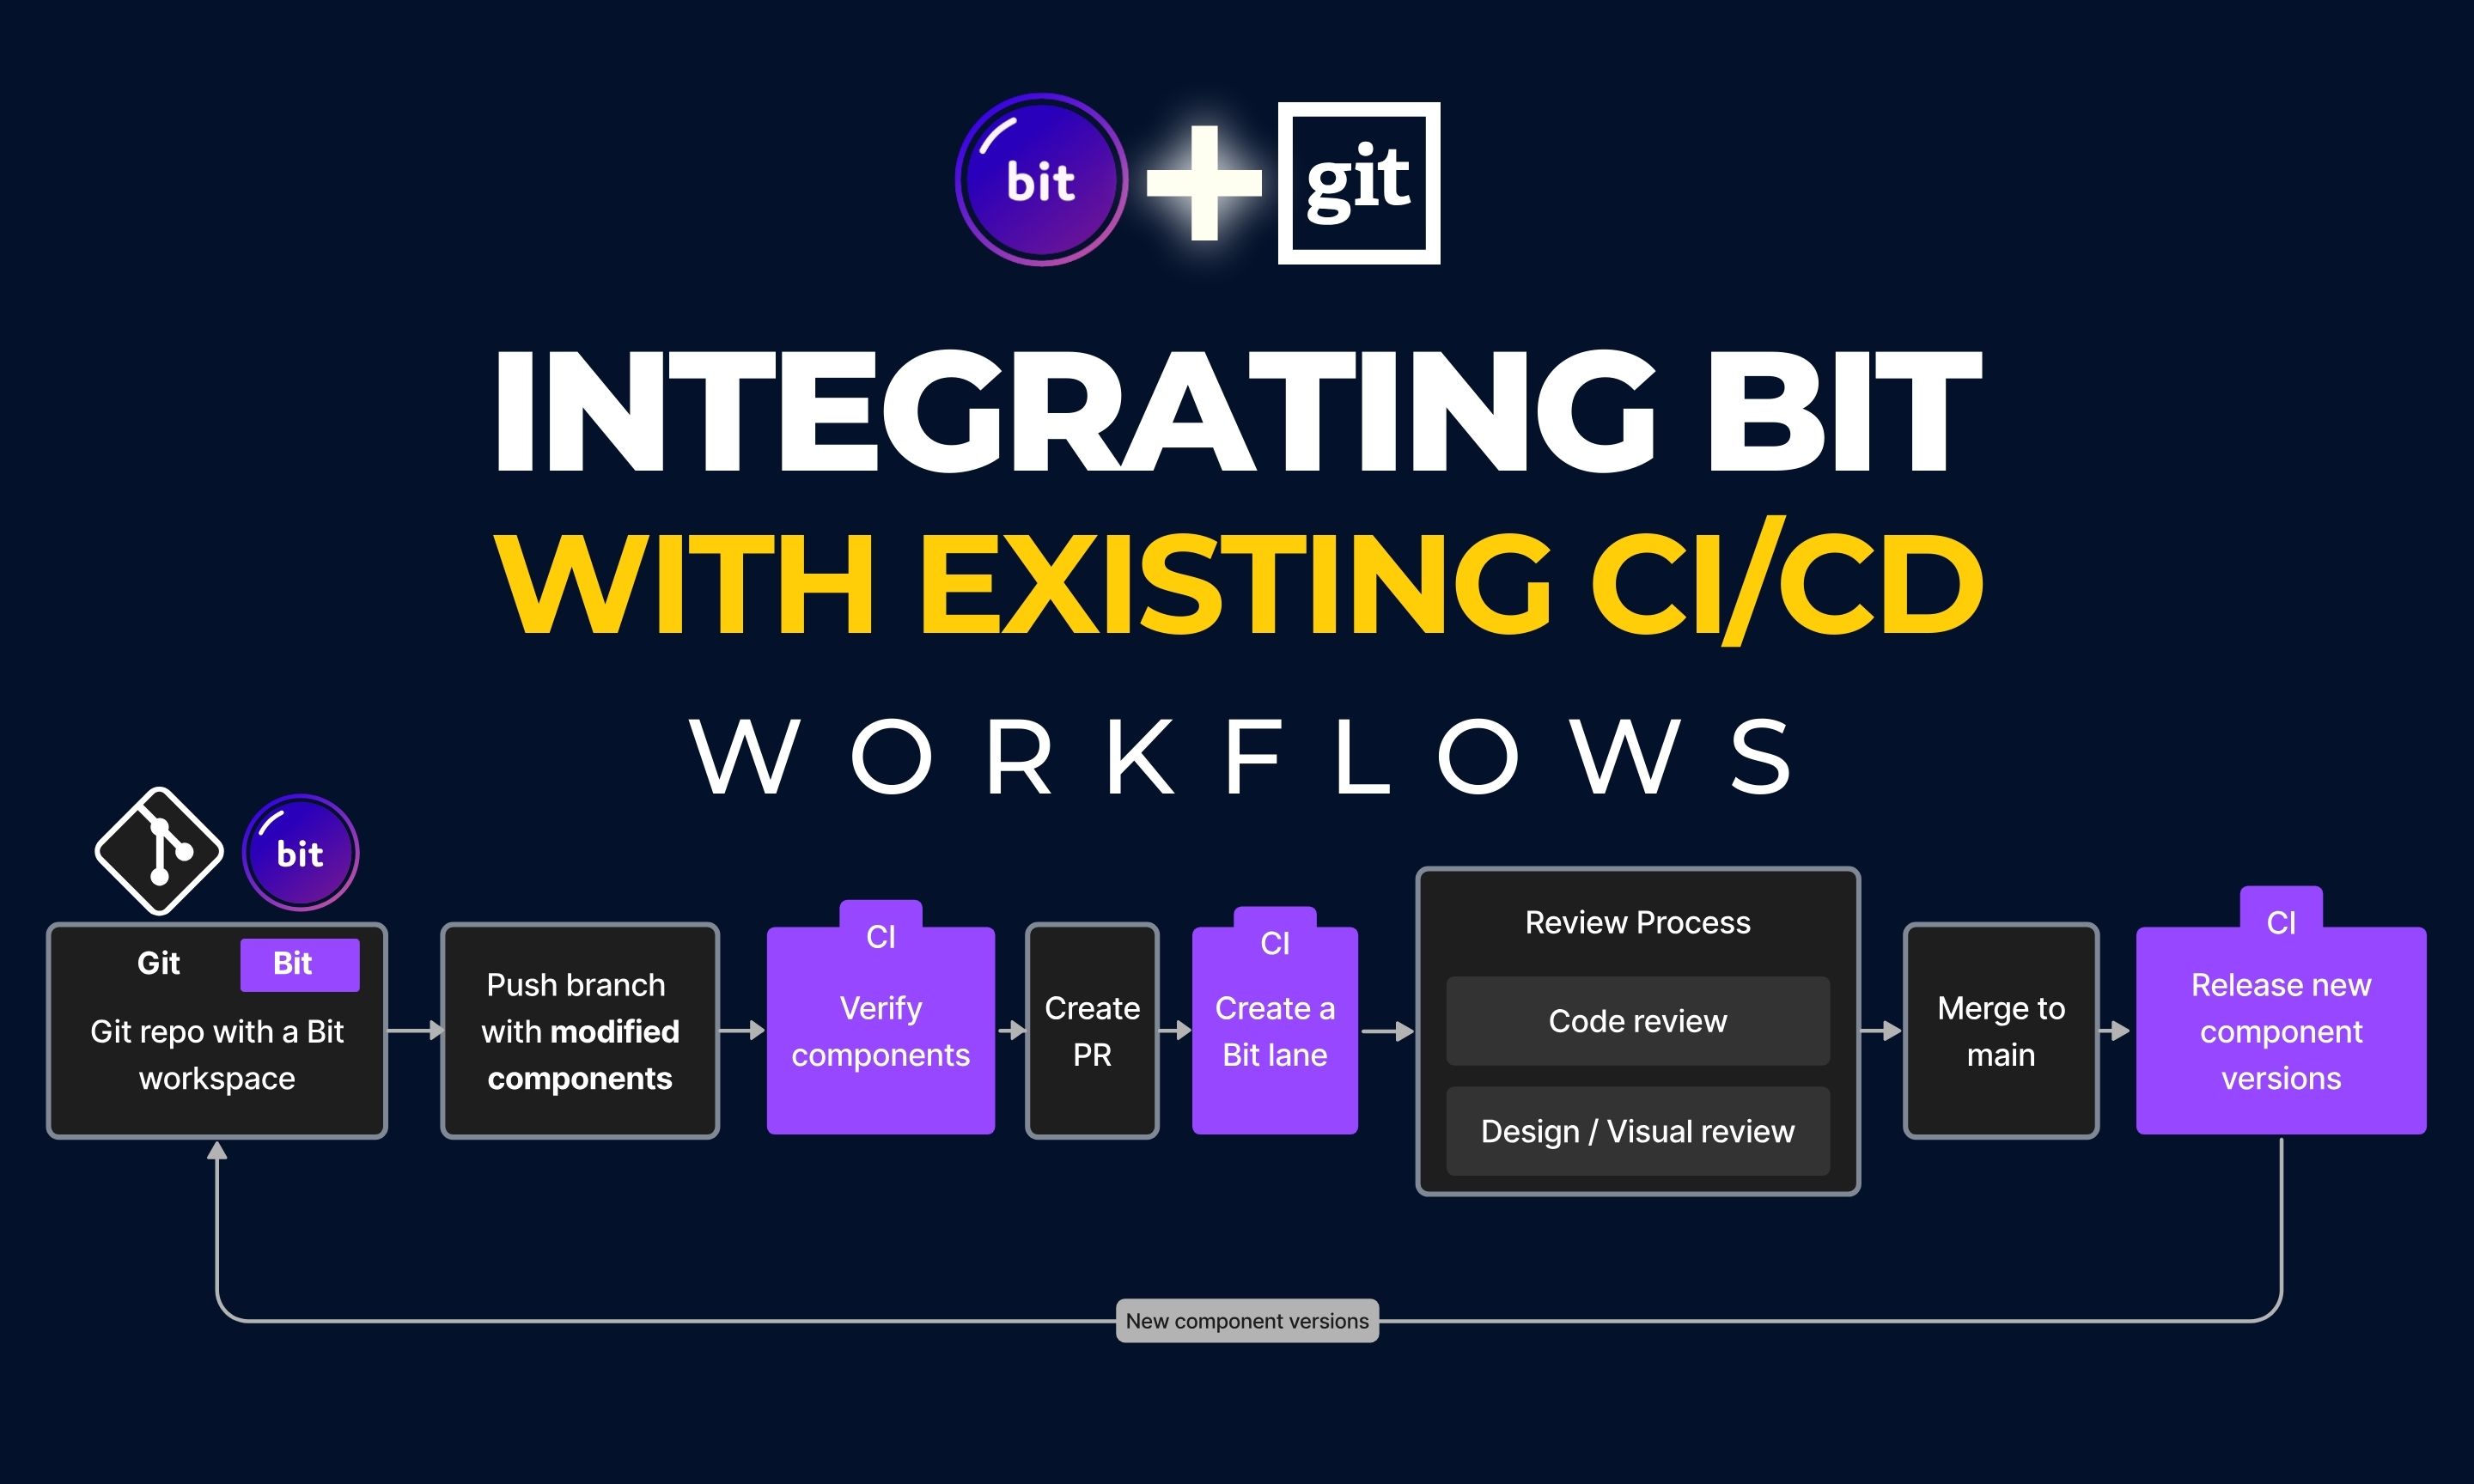
This page presents a workflow for automating component releases with Bit, Git, and third-party CI systems.
In this workflow:
- Git as source of truth. Work and collaborate with Git, and the scripts ensure to sync and mirror your work in your remote Bit scopes.
- Support standalone or integrated Bit workspace. Some directories in the repository are maintained as Bit components. Bit is used as a standalone solution or alongside other tools and frameworks.
- Using feature-branches. Features are developed in branches and merged to the main branch via pull requests.
- A Bit lane for every PR.
- Bringing together different stakeholders. Lanes are used to empower third-party tools for code review. They allow all stakeholders to review component code, dependencies and visual previews.
- Canary releases for modified components. Modified components are available temporarily (until the PR is closed) to be installed directly from the lane, and tested across different apps. See this demo PR.
- Components are released on merge. New component releases are created when changes are merged into the main branch. These components are exported to remote scopes, where they can be installed and integrated seamlessly as Node packages.

GitHub Actions with Bit: A demo
We'll use GitHub Actions to demonstrate a feature-branch workflow and review the different building blocks to use in your CI. The steps for this workflow are as follows:
- When the feature branch is pushed to GitHub, the CI tests the components in isolation
- When a PR is created or updated, the CI makes the components available to be individually reviewed
- When the PR is merged, the CI releases the modified components and commits back the changes in the workspace
You can find the complete demo on GitHub; the scope containing the components is available on bit.cloud.
Go through the bash commands the CI runs in the demo to understand the workflow.
The CI building blocks presented in this demo have corresponding solutions for other CI platforms.
1: CI Tests the Components on a Feature Branch Push
Once you commit and push the changes to your components in a separate feature branch, the CI will verify the changes by running each component's tests and building each component in isolation.
name: Demo Bit Verify
on:
  push:
    branches:
      - '*' # all feature branches
      - '!main' # excludes main
jobs:
  verify:
    runs-on: ubuntu-latest
    env:
      BIT_CONFIG_USER_TOKEN: ${{ secrets.BIT_CONFIG_USER_TOKEN }}
    steps:
      - name: Checkout repository
        uses: actions/checkout@v3
      - name: Initialize Bit
        uses: bit-tasks/init@v1
        with:
            ws-dir: 'demo'
      - name: Bit Verify
uses: bit-tasks/verify@v1Note: This task runs after pushing to a feature branch, except main.
2: CI Makes the Components Available to be Individually Reviewed on a PR

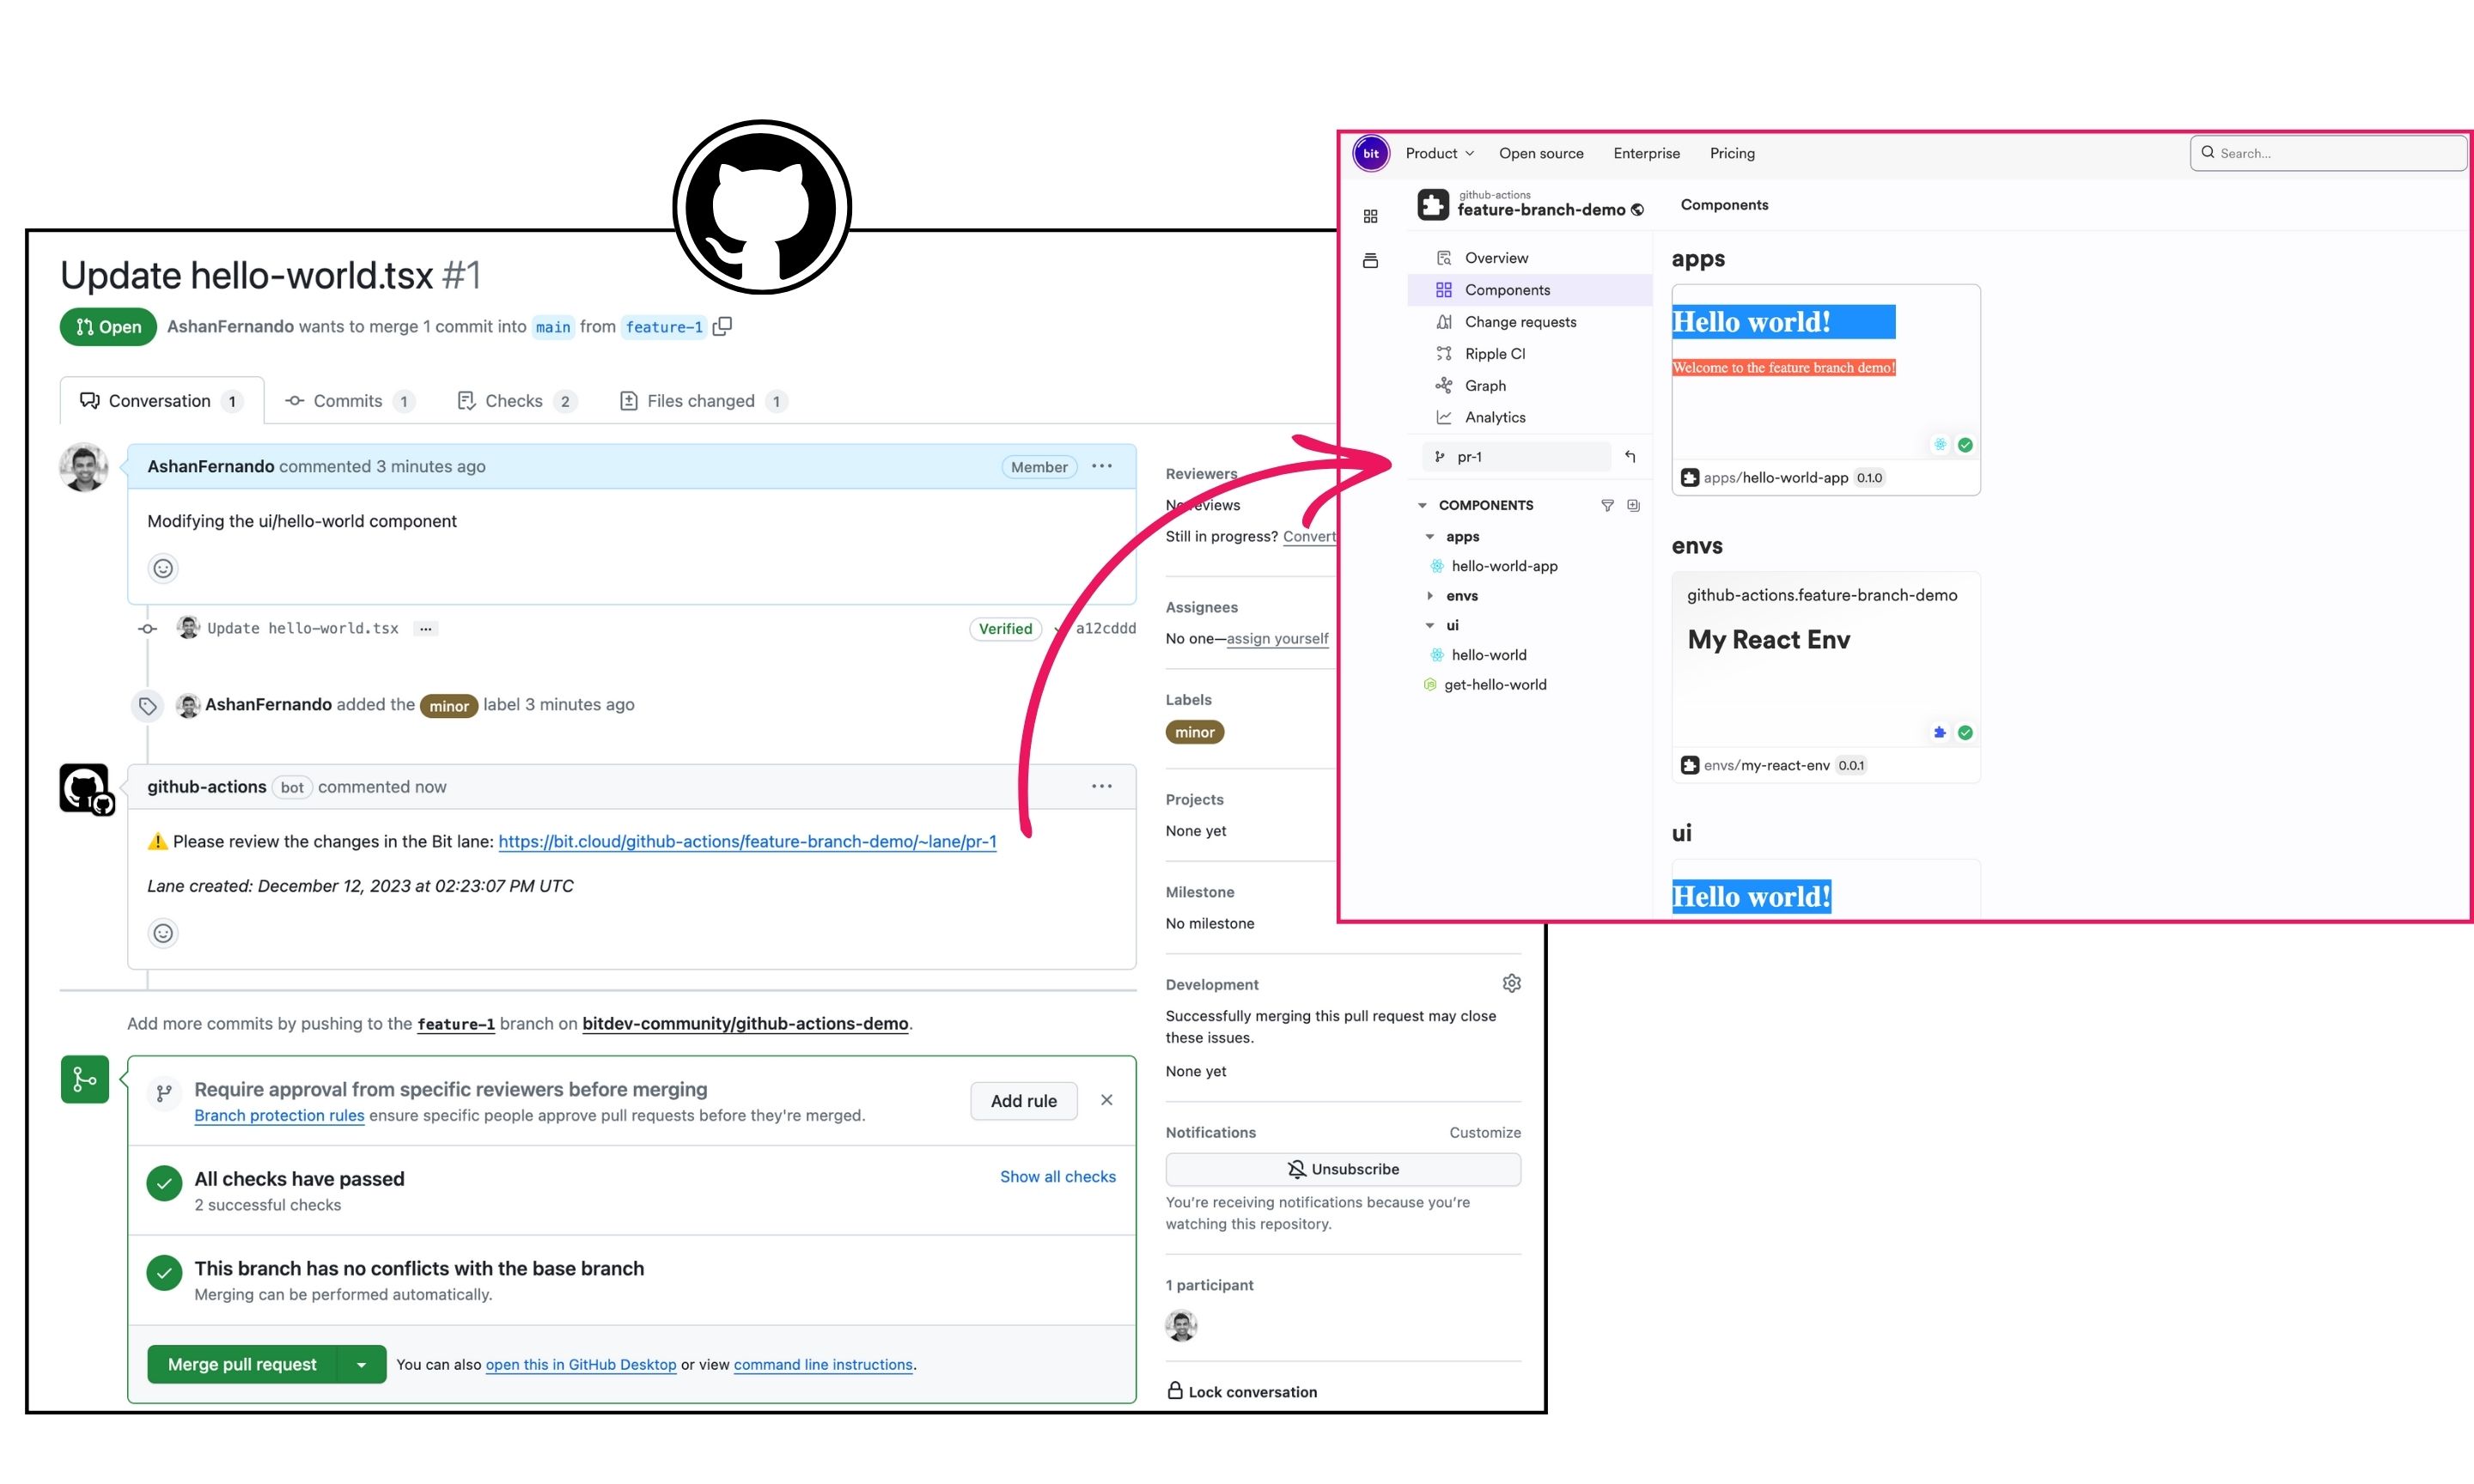
Once your feature branch is ready, create a PR (using GitHub). This triggers the pull-request step, which makes the modified components available to be individually reviewed in a separate lane on bit.cloud. These modified components can also be installed across projects for a more thorough review.
name: Demo Bit Pull Request
on:
  pull_request:
    types:
      - opened
      - synchronize
permissions:
  pull-requests: write
jobs:
  build:
    runs-on: ubuntu-latest
    env:
      GITHUB_TOKEN: ${{ secrets.GITHUB_TOKEN }}
      GIT_USER_NAME: ${{ secrets.GIT_USER_NAME }}
      GIT_USER_EMAIL: ${{ secrets.GIT_USER_EMAIL }}
      BIT_CONFIG_USER_TOKEN: ${{ secrets.BIT_CONFIG_USER_TOKEN }}
    steps:
      - name: Checkout repository
        uses: actions/checkout@v3
      - name: Initialize Bit
        uses: bit-tasks/init@v1
        with:
            ws-dir: 'demo'
      - name: Bit Pull Request
uses: bit-tasks/pull-request@v1The task shown above does several important things:
- Runs the component build and tests to ensure the components are in order.
- Creates a lane in bit.cloud and pushes the modified components to it, and finally creates a GitHub comment inside the Pull Request with the link to that lane. This lane is useful for the Pull Request reviewer to check all the modified components that are included in the Pull Request (in terms of code, dependencies, preview, and even install the suggested component changes across projects)
- Additionally, clean up the lane and create a new one upon changing the branch code.
3: CI Releases Components and Commits back the Modified Workspace on a Merge to Main
Once the Pull Request is merged into the main branch in Git, the GitHub Actions task tag-export-commit-bitmap gets trigged, which tags and exports the modified component into the bit.cloud. After that, it returns the updated file containing the newly tagged versions of the components.
name: Demo Bit Tag and Export and Commit Bitmap
on:
  push:
    branches:
      - main
permissions:
  contents: write
jobs:
  release:
    runs-on: ubuntu-latest
    env:
      GITHUB_TOKEN: ${{ secrets.GITHUB_TOKEN }}
      GIT_USER_NAME: ${{ secrets.GIT_USER_NAME }}
      GIT_USER_EMAIL: ${{ secrets.GIT_USER_EMAIL }}
      BIT_CONFIG_USER_TOKEN: ${{ secrets.BIT_CONFIG_USER_TOKEN }}
    steps:
      - name: Checkout repository
        uses: actions/checkout@v3
      - name: Initialize Bit
        uses: bit-tasks/init@v1
        with:
            ws-dir: 'demo'
      - name: Bit Tag and Export
        uses: bit-tasks/tag-export@v1
      - name: Commit Bitmap
uses: bit-tasks/commit-bitmap@v1Choosing the components release version
1. Using PR labels, PR titles, or Commit title
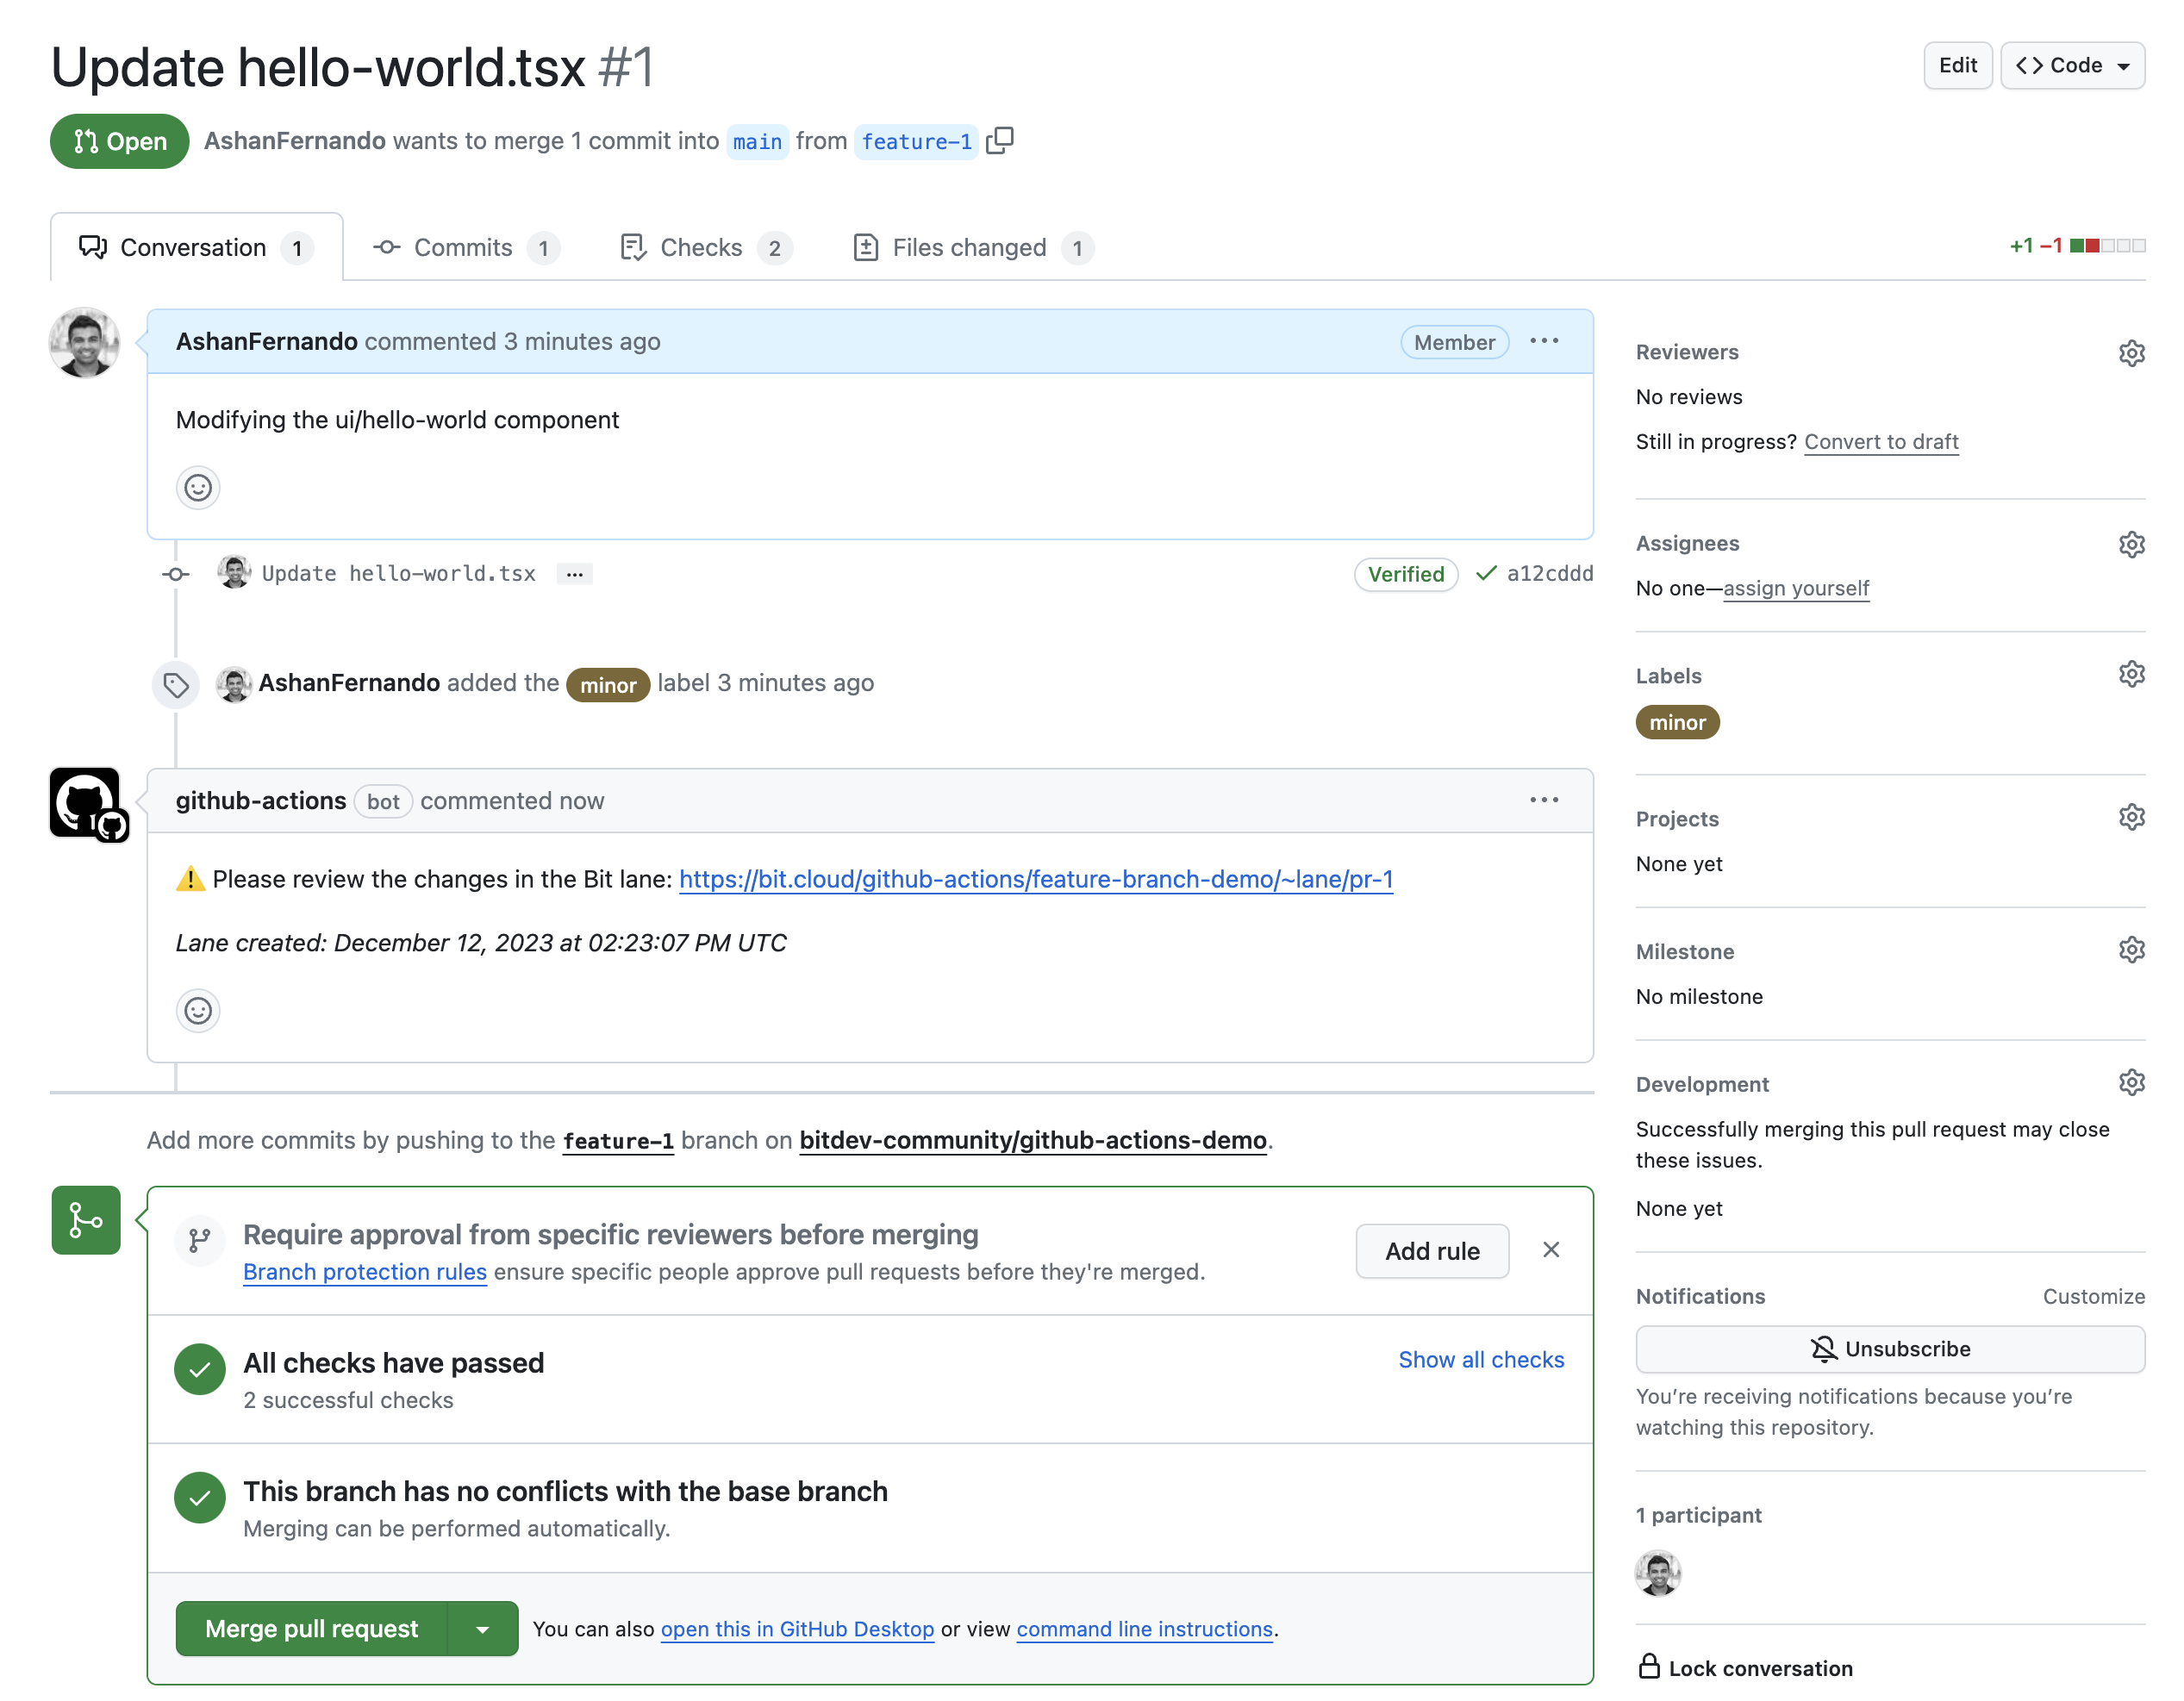
Specify the version update for your components in a PR label, a PR title, or a commit title using one of the following terms: major , minor , patch , and pre-release .
- Pull Request Labels: Use the keyword directly as a label major or enclosed within square brackets [major].
- Pull Request or Commit Title: Include the version keyword enclosed within square brackets [major] within your title text.
For example, the minor label is added in the following Pull Request:

2. Using Soft Tagging
The 'soft tag' alternative allows you to determine the version update for your components using Bit (as opposed to git commit messages or PRs on your platform). This option allows for a more granular control over the version bump of each modified component.
In this approach, you decide the version bump a modified component should have before committing the final changes to your branch and creating a PR.
In your Bit workspace, run bit tag component-name -m "my tag message" --soft --minor . This updates the .bitmap file with the proposed versions for the (soft) tagged components. Then, you can commit the component changes and the .bitmap file changes to your repository.
For your CI to release components with the version bump suggested previously using the bit tag --soft command, inlcude the persist parameter in your tag and export task in GitHub Actions as follows:
name: Demo Bit Tag and Export and Commit Bitmap for Soft Tagging
on:
  push:
    branches:
      - main
permissions:
  contents: write
jobs:
  release:
    runs-on: ubuntu-latest
    env:
      GITHUB_TOKEN: ${{ secrets.GITHUB_TOKEN }}
      GIT_USER_NAME: ${{ secrets.GIT_USER_NAME }}
      GIT_USER_EMAIL: ${{ secrets.GIT_USER_EMAIL }}
      BIT_CONFIG_USER_TOKEN: ${{ secrets.BIT_CONFIG_USER_TOKEN }}
    steps:
      - name: Checkout repository
        uses: actions/checkout@v3
      - name: Initialize Bit
        uses: bit-tasks/init@v1
        with:
            ws-dir: 'demo'
      - name: Bit Tag and Export
        uses: bit-tasks/tag-export@v1
        with:
            persist: 'true' # Persists the soft tagged components
      - name: Commit Bitmap
uses: bit-tasks/commit-bitmap@v1Step 4: CI Cleans-Up the Lane Generated for the Component Review
After merging the Pull Request, you may find several dangling lanes in bit.cloud. To remove them from their remote scope, after they've served their purpose in the reviewing process, you can run the GitHub Actions task lane-cleanup, which gets triggered upon merging (closing) the Pull Request.
name: Demo Bit Lane Cleanup
on:
  pull_request:
    types:
      - closed
jobs:
  cleanup:
    runs-on: ubuntu-latest
    env:
      GITHUB_TOKEN: ${{ secrets.GITHUB_TOKEN }}
      GIT_USER_NAME: ${{ secrets.GIT_USER_NAME }}
      GIT_USER_EMAIL: ${{ secrets.GIT_USER_EMAIL }}
      BIT_CONFIG_USER_TOKEN: ${{ secrets.BIT_CONFIG_USER_TOKEN }}
    steps:
      - name: Checkout repository
        uses: actions/checkout@v3
      - name: Initialize Bit
        uses: bit-tasks/init@v1
        with:
            ws-dir: 'demo'
      - name: Bit Lane Cleanup
uses: bit-tasks/lane-cleanup@v1You can also see that both Step 3 and Step 4 run in parallel after the pull request is merged.
Final Thoughts
This article takes you through the basic steps of setting up Git feature branch workflow support for Bit component development. For the complete workflow to work, the given example considers the GitHub repository as the source of truth for component code.
Therefore, all the component changes should be committed to the GitHub repository and let the CI build, test, and tag these components.
And there we have it. I hope you have found this helpful. Thank you for reading !!!
