Component-Driven Microservices with NodeJS and Bit
You can watch me talk about Microservices with Bit here:
A service is a component
Most people think of components as part of the frontend. Nevertheless, CBSE (Component-based software engineering) was used at the backend long before the term "frontend" was coined.
A CBSE system is composed of loosely coupled independent components. For example, the role of components can be seen in service-oriented architectures (SOA), where the web service converts a component into a service, which then inherits additional characteristics.
Since Microservices are essentially components, creating them with components makes sense. The result is a very fine granular modularity, in which each piece of a microservice (e.g util function) can easily be reused for another microservice.
Our goal in this blog post is to demonstrate how easy it is to build a Microservices-based system using components created with Bit (remember, services are really just components). Bit handles everything for us - versioning, dependency management, building and testing Microservices components - without requiring any configuration. We're in for an exciting ride, so let's get started!
An approach to modularizing microservices
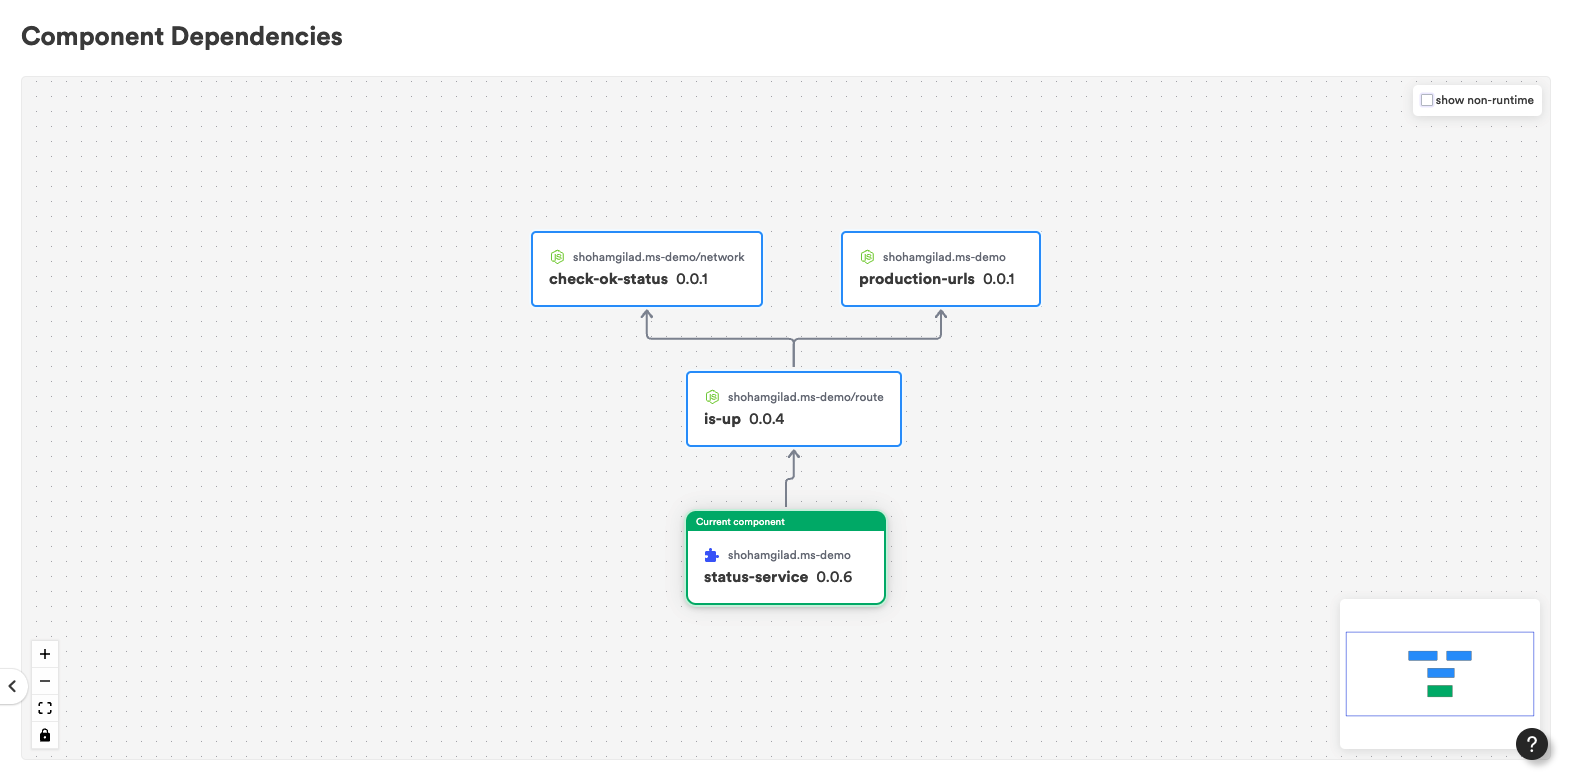
We're going to create a simple microservice that monitors the status of our production site.
It will be composed of three independent components built with Bit:
- The performance-service app is the actual express server.
- The production-url component. In this component, we store all of the URLs for our production sites. Later on, we will see the benefits of holding them in such a component.
- The is-up route component. The purpose of this component is to check if the site is up.
Again, I would like to emphasize that each of these components is completely independent, so we can easily reuse them in another project. As an example, if we need to use the production-urls constant in another microservice, we can just add it as a dependency. The is-up route component is no different.
The dependency graph is also kept by Bit, so if we update the production-url component, both microservices that depend on it will be updated automatically.
Here's a glimpse of the system we're going to build (it looks better on the code tab 😉):
This guide assumes that you have a bit.cloud account and know how to open a remote scope.
Setting up our workspace
The first step is to create a Bit Workspace. A Workspace is a development and staging area for components. Here, we create new components, retrieve and modify existing ones, and compose them together.
Bit’s workspace is where you develop and compose independent components. Components are not coupled to a workspace; you can dynamically create, fetch, and export components from a workspace and only work on them without setup.
Each component is a standalone “mini-project” and package, with its own codebase and version. The workspace makes it easy to develop, compose, and manage many components with a great dev experience.
You can develop all types of components in the workspace, which is tech-agnostic. A workspace can be used as a temporary, disposable context for components, or as a long-term workshop.
Without further ado, let's create a Workspace. In the designated directory, run the following command:
In the root of your workspace, two files and one directory will be created:
workspace.jsonc: This file contains the configuration of the Workspace..bitmap: Here Bit keeps track of which components are in your workspace. You shouldn't edit this file directly..bit: This is where the component's objects are stored.
Here is how the Workspace looks like:
Please ensure you replace "defaultScope": "[your-bit-cloud-username].[scope-name]" with your Bit Cloud user name and the scope name.
Creating the app component
It's time to create our first microservice component.
First, we will create an application component. By using application types, components can be built, served, and deployed. Each application type offers a different build strategy for development and production, as well as a different deployment strategy.
The following command will create a new component based on the express-app template.
You can see that the template comes with all the boilerplate code you need.
You can create your own templates. To learn how, watch this video.
bit status is a useful command that tells you what's the status of components in your workspace is. Let's run it to see if everything is okay:
Here's the output we get:
new components
(use "bit tag --all [version]" to lock a version with all your changes)

     > status-service ...  issues found
       missing dists (run "bit compile")

       missing packages or links from node_modules to the source (run "bit install" to fix both issues. if it's an external package, make sure it's added as a package dependency):
          route.ts -> express
status-service.app-root.ts -> expressWe are missing dists, which can be easily fixed with bit compile:
You can run
bit watchin another terminal and bit will compile your component's code automatically every time you modify it.
Dists are generated in the dist directory of each component in the node_modules folder.
node_modules
└── @shohamgilad
    └── ms-demo.status-service
        ├── dist
        │   ├── get-port.js
        │   ├── get-port.js.map
        │   ├── index.js
        │   ├── index.js.map
        │   ├── mock-route.js
        │   ├── mock-route.js.map
        │   ├── route.js
        │   ├── route.js.map
        │   ├── status-service.app-root.js
        │   ├── status-service.app-root.js.map
        │   ├── status-service.docs.mdx
        │   ├── status-service.node-app.js
│ └── status-service.node-app.js.mapAdditionally, our application requires the express package. Along the way, let's install it and its types:
Behind the scenes, Bit will install express and its types using pnpm. Learn more about advanced Bit dependency management and configs in this blog post from the creator of pnpm.
As I mentioned, the component we created is an application component. We need to run the use command for Bit to recognize it as an extension to our workspace.
Don't forget to replace my bit.cloud username and scope name with your own.
You can see that our component has been registered to our workspace by running the following command:
Outputs:
┌─────────────────────────────────────────┬────────────────┐
│ id                                      │ name           │
├─────────────────────────────────────────┼────────────────┤
│ shohamgilad.ms-demo/status-service      │ status-service │
└─────────────────────────────────────────┴────────────────┘
Now we can run the application:
You'll see nothing but "Hello World!" at http://localhost:3000/. The reason for this is that we haven't added any routes to our application (the only route is the mock route).
Before adding a route component, let's release the first version of our application component.
Versioning Microservices
Now that we have created our first component, Bit will keep track of any changes you make.
It's time to tag the first version of the service component. Type the following command:
When tagging a component, compilation, testing, and building are done. Consequently, the component can be trusted to work correctly.
It is how you mark a component as exportable. This locks the component's state to the tagged version.
Moreover, tagging with Bit also makes your component consumable (by creating a package).
When the tagging process is complete you should see this kind of output:
new components
(first version for components)
> status-service@0.0.1Creating the route and utility function components
In this step, we will create a route component that checks if a given url "is up", which is the case when the response status is 200.
But first let's create a very simple function that returns a list of all of the organization's active URLs.
The template we are going to use the node template which a general purpose template for node components:
Here's the code for our function:
export function productionUrls() {
  return {
    'community-site': {
      url: 'https://bit.dev',
      description: 'our community site',
      id: 'community',
    },
    'cloud-site': {
      url: 'https://bit.cloud',
      description: 'our cloud site',
      id: 'cloud',
    },
  };
}Componentizing our production URLs has the benefit that if we decide to change a URL later on, we can update it in one place and all its dependent components (which consume this URL) will be updated as well. Furthermore, it can be shared within the organization, so it can be maintained once and everyone can align on it.
Let's use the create command again to generate a new component based on the express-route template :
Here's the implementation of the route component:
import { productionUrls } from '@shohamgilad/ms-demo.production-urls';
import { checkOkStatus } from '@shohamgilad/ms-demo.network.check-ok-status';

export function getIsUpRoute() {
  return {
    method: 'get',
    route: '/is-up',
    middlewares: [
      async (req, res) => {
        const results = await calculateResults();
        return res.json(results);
      },
    ],
  };
}

export async function calculateResults() {
  const urls = productionUrls();
  const results = {};
  const promises = Object.values(urls).map(async (val) => {
    const status = await checkOkStatus(val.url);
    results[val.id] = status;
  });
  return Promise.all(promises);
}

export function getMockResults() {
  const urls = productionUrls();
  const results = {};
  Object.values(urls).map((val) => {
    // Mock all with true
    const status = true;
    results[val.id] = status;
  });
  return results;
}There are two dependencies on the component above - `production-urls` and `network.check-ok-status`. We already have the `production-urls` component in our workspace, but not the `network.check-ok-status` component. In order to make it available in our workspace, we'll need to install it.
$bit install @shohamgilad/ms-demo.network.check-ok-status
A major advantage of creating components for each route is that we can inject routes into our application using the inversion of control(IoC) pattern. This pattern is very powerful, as it allows us to inject routes into our application without modifying it.
This means that the teams that create the routes do not have to worry about the application code. They only need to register their routes with the app component, and the app component will take care of the rest.
In this tutorial, we will not be using the IoC pattern. You can see how the component-aspect registers routes to the express aspect if you want to see a demonstration of such a pattern.
Let's tag all component in our workspace:
We get this output:
✖ teambit.pipelines/builder, running build pipe for 2 environments, total 15 tasks (completed in 15s)

The following errors were found while running the build pipeline
Failed task 1: "teambit.defender/tester:TestComponents" of env "teambit.harmony/node"
component: shohamgilad.ms-demo/production-urls@0.0.1
Error:   ● should return the correct value

    expect(received).toBe(expected) // Object.is equality

    Expected: "Hello world!"
Received: {"cloud-site": {"description": "our cloud site", "id": "cloud", "url": "https://bit.cloud"}, "community-site": {"description": "our community site", "id": "community", "url": "https://bit.dev"}}We ran our tests in a Jest environment without installing Jest. How does this happen? Component environments make this possible. Envs are components' reusable development environments. They simplify and standardize component development workflows, such as testing, compiling, and more. Since components envs are still components, they are fully customizable.
There was a problem with the tagging process 😔. Nevertheless, this shows Bit makes sure we don't save broken versions. 😀 Let's fix it:
import { productionUrls } from './production-urls';

it('should return the correct value', () => {
  const length = Object.values(productionUrls()).length;
  expect(length).toBe(2);
});And tag again:
Success!
new components
(first version for components)
     > production-urls@0.0.1
     > routes/is-up@0.0.1

changed components
(components that got a version bump)
> status-service@0.0.2Dependencies
Dependencies are at the heart of composable software. When you change a component, Bit will update the dependencies graph for that component. Therefore, if you change a component, you are also changing its dependent components. The dependencies graph is used to derive tests, builds, and versions. This makes the development process more efficient and reliable.
If you are interested in learning more about how painless it is to use Bit for dependency management, please read this blog post by Zoltan Kochan.
Let's add another url to the list of production URLs:
export function productionUrls() {
  return {
    'community-site': {
      url: 'https://bit.dev',
      description: 'our community site',
      id: 'community',
    },
    'cloud-site': {
      url: 'https://bit.cloud',
      description: 'our cloud site',
      id: 'cloud',
    },
    'new-site': {
      url: 'https://bit.new',
      description: 'our new site',
      id: 'new',
    },
  };
}We should also modify our test file:
import { productionUrls } from './production-urls';

it('should return the correct value', () => {
  const length = Object.values(productionUrls()).length;
  expect(length).toBe(3);
});And tag the workspace again:
We would expect that Bit will only tag only the production-urls component, but it actually tags all components.
changed components
(components that got a version bump)
     > production-urls@0.0.2
       auto-tagged dependents:
            routes/is-up@0.0.2
status-service@0.0.3You can see that Bit automatically tags all components that are dependent on the modified component. Our components are always in sync this way.
All of this is based on just one microservice. You could have dozens of microservices relying on this production-urls component. I love how intuitive it is to update the production-urls component and see all microservices automatically updated.
Collaboration on microservices
We have the network.check-ok-status component installed as a dependency of the routes/is-up component, but it is not imported in our workspace, so we cannot edit it.
Let's import it into our workspace:
This component was not built by us, so we don't want to tag it with a new version without permissions.
Rather, we should open a lane for our workspace and snap the components after they have been modified. The lane can then be sent to the person in charge of this component, who can approve and merge the changes.
Run the following command to open a lane and checkout to it:
We can now edit the network.check-ok-status component:
export async function checkOkStatus(url: string): Promise<boolean | null> {
  try {
    const res = await fetch(url);
    return res.status === 200;
  } catch (e) {
    return null;
  }
}Just added the abillity to return a null value.
Now let's snap changes:
Tagging and snapping are similar. Our main difference is that snapped hash is not intended for consumption. There is no semantic version of a snap to communicate how to use it safely, and there is no corresponding published package for a snap.
This is the output we get:
3 component(s) snapped on "is-ok" lane
(use "bit export" to push these components to a remote")
(use "bit reset" to unstage versions)

changed components
(components that got a version bump)
     > shohamgilad.ms-demo/network/check-ok-status@6be1245768257e8af95aebf882e4de9d5e3ddc9e
auto-snapped dependents: routes/is-up@1b21bca5964da7e4093af16f0477a09c08589f69, status-service@6c440f637aef56567c45e068348e73d482ad0510Now all we have left is to share our work with the world:
Conclusion
Considering that a (micro)service is essentially a component, component-driven development makes sense.
In this short tutorial, we learned how to:
- Create an independent component.
- Separately version each component.
- Manage dependencies.
- Component testing.
- Propose changes to components.
The most amazing part is that all of this was made so easy for us without requiring a single configuration file! All you have to do is run some Bit commands, and Bit will take care of everything.
This is how we build our microservices, this is how we build our front-end apps, and this is how we build Bit :)
Gilad leads Bit's development team. A former architect and team leader at Sisense. IDF elite programming unit graduate and founder of Propcy and Stunity.
He is known for his passion for automating everything in his home. Drinking coffee during the day helps him write code. In the evenings, he writes code so he can drink coffee. As he codes, he makes coffee: